
Tuesday, December 26, 2017
Recap
Hope you had a Merry Christmas! There were 18 of us at Christmas dinner so we had lots of cookie tasters. I asked what was everyone's favorite cookie but I couldn't get a consensus. Old favorites like the smores cups came up but of the new cookies, I heard Andes mint cookies a few times as well as the buckeyes with the toffee and the key lime filled pizzelles. I think everyone enjoyed sampling but nobody tackled trying to eat all 24 after a big Christmas dinner. Actually, if they had tried all varieties, they would have eaten 28 different cookies (Pecan Tassies with and without chocolate, plain and red velvet Oreo truffles, ricotta cookies with lemon glaze and with butter cream icing, buckeye with and without toffee bits). I guess they are older and wiser and more concerned about waistlines! I enjoyed my first crack at blogging and of course always love baking. The baking sheets have been put away until next year (mostly)!

Sunday, December 24, 2017
Day 24 - Rolled Pizzelles with Key Lime Filling
For the last cookie, we decided to make something that is a favorite of Greg's. He loves key lime pie and I found a recipe for key lime cannolis that gave me the idea for these. The recipe made a rolled lace cookie as the shell. While it was delicious, it was very delicate and I didn't think it would work well on a cookie tray. So instead of the rolled lace cookie, we decided to roll a pizzelle. A pizzelle is a flat Italian cookie that reminds me of a waffle cone. You need a special pizzelle maker, but not to worry, I had another friend, Christine, who let me borrow hers! The pizzelles were the perfect vehicle for the key lime filling. The filling made me long for summer at the beach! Marissa left a couple of the filled pizzelles for Santa with a note. She had a hunch he would like these! I think the rest of the family will too, but if they don't, I know someone who will be happy to eat the leftovers. Hope you have enjoyed the cookie advent journey with me this month. Now all that's left to do is enjoy the cookies! Merry Christmas!
Pizzelles:
1 1/4 cups all-purpose flour
1 1/2 teaspoons baking powder
2 large eggs
Pinch of salt
1/2 cup sugar
1 teaspoon vanilla extract
3 ounces unsalted butter melted and cooled
Confectioner's sugar for dusting
Directions:
Key Lime Filling:
In a bowl with an electric mixer beat cream cheese with sugar, zest and lime juice until smooth and beat in mascarpone. Chill filling covered until firm, at least 4 hours and up to 1 day.

Pizzelles:
1 1/4 cups all-purpose flour
1 1/2 teaspoons baking powder
2 large eggs
Pinch of salt
1/2 cup sugar
1 teaspoon vanilla extract
3 ounces unsalted butter melted and cooled
Confectioner's sugar for dusting
Directions:
Preheat
the pizzelle iron, and grease or spray it if suggested in the
manufacturer's instructions. Set out a cooling rack for the baked
cookies. Put flour and baking powder in a medium bowl and whisk to
blend; set aside. In another bowl, whisk together eggs and salt until
foamy, then gradually whisk in the sugar. When mixture is smooth, whisk
in the vanilla, followed by the melted butter. Switch to a rubber
spatula and fold in the reserved dry ingredients.
Using
about 2 teaspoons (we used 1/2 tablespoon of batter) for each pizzelle, place batter in center
of the iron, close, and bake about 2 minutes, or until golden and firm.
Don't open the iron until the steam stops. As soon as the pizzelle is
baked, remove from the iron to the cooling rack and continue making
pizzelles with remaining batter. Should any of the pizzelles need
coaxing to come off the iron, nudge them with a spatula or fork and then
peel them off with your fingers. Roll them into "cannoli" shells by draping over a wooden spoon as soon as they come off the iron and are piping hot and still pliable. Fill cooled shells with key lime filling or traditional cannoli filling.
Dust with confectioner's sugar
before serving.
Key Lime Filling:
4 ounces cream cheese, softened
1/3 cup granulated sugar
2 teaspoons freshly grated lime zest
4 tablespoons bottled key lime juice or 5 tablespoons fresh lime juice
1 cup mascarpone cheese (about 1/2 pound)
In a bowl with an electric mixer beat cream cheese with sugar, zest and lime juice until smooth and beat in mascarpone. Chill filling covered until firm, at least 4 hours and up to 1 day.

Saturday, December 23, 2017
Day 23 - Rainbow Cookies
These Italian treats are truly a labor of love as they take a fair bit of time to make. In fact, it was a two day effort. It didn't start out that way, I was going to make them as yesterday's cookie, but we had a little mishap that set us back a bit in our process. As I was baking the 3rd layer, I had a problem flipping the cake over onto the wire rack and the result was that the third layer broke into too many pieces to use and Marissa ended up with a small burn from the pan touching her forearm trying to help me! So I had to redo the third layer (remake the cake taking 1/3 of the ingredients -- required some elementary school math -- Good thing I live with a math wiz). I made these cookies for the first time last year. I had never heard of them and my sister, Lally mentioned that it was a favorite cookie of one of her friends. Also a friend from work, Polly, said she loved them and her sister made them every year at Christmas. Polly shared her sister's recipe with a note that instead of using almond paste as the recipe stated, her sister used almond pastry filling. I didn't listen to this instruction as all the recipes I had seen, used almond paste. The result last year was good but not great. But they were so pretty and looked great on the cookie tray, I decided I would try them again. This year I made them with almond pastry filling as I did find another recipe that also said to do this and the result was a moister cake. It was definitely an improvement. I was very happy with the result this year. I hope my family thinks they were worth the effort and scars.
Ingredients:
1 can (12.5 ounces) of almond pastry filling (Solo makes -- in baking aisle)
1 and 1/2 cups butter, softened (plus more for pans)
1 cup sugar
4 eggs, separated
2 cups all purpose flour
6-8 drops of red food coloring
6-8 drops of green food coloring
1/4 cup seedless raspberry jam
1/4 cup apricot jam
12 ounces of semisweet chocolate chips, melted
Grease the bottoms of three 13x9x2 inch baking pans. Line the pans with parchment paper; grease and flour the paper. Cream butter and sugar until light and fluffy. Add almond filling and beat until smooth; Add egg yolks and mix until combined. Add flour and mix until blended. In a separate mixing bowl, beat egg whites with the whisk attachment of the mixer and beat until soft peaks form. Fold into dough, mixing until thoroughly blended. Divide dough into three portions (about 1 and 1/2 cups, in each). Color one with red food coloring, one with green coloring, and leave the third portion uncolored. Spread batter in pans using an offset spatula. Bake each color in prepared pans at 350 degrees for 10-12 minutes (mine needed 12) or until edges are slightly brown. Cool for 5 minutes in the pan, then invert onto wire rack and remove parchment paper. Cool completely. Place green layer on a piece of plastic wrap. Spread evenly with raspberry jam. Top with uncolored layer and spread evenly with apricot jam. Top with pink layer. Cover with plastic wrap and slide onto a baking sheet and set a cutting board or flat pan on top to compress layers. Refrigerate 1 hour or overnight.
Cut into 1 to 1/12 inch wide logs. Cover top and sides with melted chocolate. Refrigerate to set. Cut logs into small squares (1/2 inch).

Friday, December 22, 2017
Day 22 - Mini-Cheesecakes with Cranberry Topping
Today I made a favorite of Michael's. They are bite size so no guilt eating these and they satisfy your cheesecake cravings. You can top them with lemon curd or a cranberry topping which is great for the holidays. I have also topped with a strawberry glazed with jam.
Ingredients:
1 cup graham cracker crumbs (8 double cookies)
4 tablespoons unsalted butter
1 package (8 ounce) cream cheese, softened
1/3 cup sugar
1 large egg
2 tablespoons sour cream
1/2 teaspoon vanilla
2 teaspoons lemon juice, freshly squeezed
Ingredients for Cranberry topping
1/4 cup water
1/4 cup plus 2 tablespoons sugar
1 cup cranberries (fresh or frozen)
2 and 1/2 teaspoons cornstarch
Preheat oven to 375 degrees.
In a medium bowl, stir together the graham cracker crumbs and butter until evenly mixed. Spoon 2 rounded teaspoons of the crumb mixture into each depression of 24 mini-muffin tins (1 and 3/4 inch by 1 inch tins) and press into the bottoms and up the sides.
In an electric mixer, beat cream cheese and sugar about 3 minutes until very smooth, preferable with the whisk beater. Beat in the egg, scraping the sides of the bowl. Add the vanilla and lemon juice and beat until incorporated. Add the sour cream and beat just until the mixture is blended.
Fill each graham cracker-lined depression almost to the top with the batter, using a spoon. Set mini-muffin pans on a baking sheet in the oven. Bake for 10 minutes. For even baking, rotate the pans from top to bottom and front to back halfway through the baking period. The cakes will puff up but deflate on cooling, leaving shallow hollows perfect for filling with the topping.
Cook completely in the pans on wire racks. Refrigerate for at least 3 hours.
To unmold the chilled cheesecakes, fill the sink with a few inches of hot tap water. Carefully dip each pan into the water for about 30 seconds, being careful not to allow the water to get to the top of the pan. Use a small metal spatula or sharp knife to slip in between the sides of the cakes and the pan to pop out the cakes. There is no need to run the spatula around the sides; the hot water makes the unmolding easy.
For filling, combine all the topping ingredients in a small saucepan and bring to a boil stirring constantly. Stop stirring and reduce heat and simmer for 1 minute, swirling the pan occasionally. The mixture will be thickened but pourable. Allow it to cool to room temperature. Use a small spoon to place 3-4 berries with the glaze onto each unmolded cheesecake.

Thursday, December 21, 2017
Day 21 - Oreo Truffles
We made these truffles for the first time in May for my nephew David's pre-prom party. Marissa and I made a bunch of desserts for the party and these were so pretty and delicious. Marissa had the great idea of using red velvet Oreos for these today, to give them a holiday flare! They looked so festive with red inside against the white chocolate coating. I was lucky enough to have Marissa do the work on these today since we had a busy evening meeting friends for dinner. We made some with red velvet Oreos and some with regular Oreos. Both were delicious yet had distinctly different tastes.
Ingredients:
1 package red velvet Oreos
5 ounces of cream cheese ( recipes used anywhere from 3 to 6 ounces) for the red velvet, with the regular Oreos which is a larger package use 8 ounces of cream cheese)
1 package of white chocolate chips, melted in double boiler or microwave (use 20 second intervals stirring in between)
Grind Oreos in food processor to make crumbs. Mix cream cheese in electric mixer until creamy. Add Oreo crumbs and mix until combined. Roll mixture into one inch balls. Freeze balls for 10 minutes. Dip in melted white chocolate and place on a tray lined with wax paper; add sprinkles and let sit until chocolate is set (refrigerator makes it set faster). Makes about 20 truffles.

Wednesday, December 20, 2017
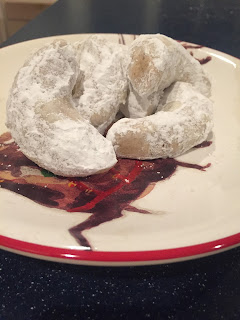
Day 20 - Cardamom Crescents
I was drawn to this recipe because of the cardamom. I am a little obsessed with the spice. I was watching Demaris Phillips on Food Network and she said she adds cardamom to anything that has cinnamon. That gave me the idea to add it to my pumpkin bread. I loved the addition. It has a certain warmth that complements the cinnamon beautifully. Cardamom reminds me of my mom. She used cardamom a lot in her cooking so just the smell of the spice feels like a warm hug from mom. She was an incredible cook and it was her way to show you how much she loved you. If she knew you loved a particular food, she would make sure to make it when you came over. Whether it was chicken parmesan or homemade french fries for her grandchildren, or cheesecake or apple pie she remembered that you loved, she made sure that it was on the menu when you came over. This recipe made me think of her and I can't wait to share these light, melt in your mouth cookies with the special people in my life.
Ingredients:
2 and 1/2 cups all purpose flour
3/4 teaspoon ground cardamom (I think it could have used a little bit more, next time I will add 1 tsp)
1/2 teaspoon ground cinnamon
1/2 teaspoon kosher salt
1 and 1/2 cup powdered sugar, divided
1 cup pecans (I toasted them lightly, to enhance the flavor)
1 cup (2 sticks) unsalted butter, room temperature
1 tablespoon vanilla extract
Preheat oven 350 degrees. Line 2 baking sheets with parchment paper. Whisk first 4 ingredients in a medium bowl. Combine 1/2 cup sugar and pecans in a food processor; pulse until coarse meal forms. Using an electric mixer, beat butter and vanilla in a medium bowl until creamy, 2-3 minutes. Add nut mixture; beat to blend. Add dry ingredients; blend well ( dough will be moist but still crumbly). Transfer to a work surface; knead to form a ball, about 4 turns.
Measure 1 rounded tablespoon of dough; form into a ball, then roll into a 1 and 1/2 inch long log (ours might have been almost 2). Gently bend into a crescent shape, pinching the ends to taper (cookies may crack slightly). Repeat with remaining dough, spacing about 1 inch apart on the prepared sheets.
Bake until bottoms are golden, 12-15 minutes. Sift remaining 1 cup powdered sugar into a shallow wide bowl. Working in batches of about 8 cookies each, roll warm cookies gently in powdered sugar to coat. Transfer to wire rack to let cool. Roll or dust cooled cookies with powdered sugar. Can be made 5 days ahead. Store airtight at room temperature. I freeze them after they are cooled to keep them fresher.

Tuesday, December 19, 2017
Day 19 - Browned Butter Madeleines
Madeleines are very popular right now but to be honest, I can't remember trying one, but I have wanted to make them for a while. It has been on my potential cookie list for several years but I would shy away from them because they seemed a little bit tricky to make and I don't usually like making something that may or may not turn out. I read a lot about the tricks to getting them to turn out with the signature hump in the middle. One key was not to spread the batter in the pan, just let it spread while baking. Also, another recipe said to refrigerate the pan after coating with butter, before you put the batter in the pans. Both were good tips. The recipe is pretty easy, just a few ingredients but needs time to rest and requires a little guess work as to the amount to fill the molds. I am not usually one for guess work. I like precise directions that are fool proof. Well I am happy to say that this recipe worked and I loved my first madeleine. I did a little happy dance when I turned on the oven light while they were baking and saw the signature hump in the middle! Julia Child you have met your match (well not exactly but I did feel a little French while making these). I borrowed the pan from my friend Mary Claire as I didn't want to invest in another pan without knowing that it was something I wanted to do more than once. I think a Madeleine pan is in my future!
Ingredients:
2 large eggs, beaten and at room temperature
2/3 cups sugar
1 cup all purpose flour, plus 1 tablespoon for pans
1 stick unsalted butter, plus 1 and 1/2 tablespoons for pans
1 teaspoon vanilla paste or extract
pinch of salt
Directions:
Combine sugar with one cup of flour and pinch of salt in medium mixing bowl. Add eggs and beat vigorously with a wooden spoon to blend into a heavy paste. Set aside for 10 minutes.
Bring all the butter to a boil until it begins to lightly brown - transfer to small bowl. Note: I took the butter off the heat when it starts to bubble like crazy and I couldn't see the bottom of the pan. By the time you pour it from the pot to the bowl the butter is brown with a nice nutty scent. If you go to far it will burn and you will have to start over. Mine maybe could have gone a tad longer.
Combine 1 and 1/2 tablespoons of the browned butter with 1 tablespoon of flour in a tiny bowl and set aside.
Cool butter slightly by stirring bowl over cold water or put the bowl in the refrigerator for a few minutes.
Stir cooled butter, vanilla and salt into flour/sugar/egg paste with a wooden spoon. Go slowly at first so you don't get butter all over the kitchen. Then mix with more force until batter comes together.
Cover the batter and let it rest in the refrigerator for an hour (could be up to 3 hours).
Preheat oven to 375 degrees. Drop a rounded tablespoon of batter into each Madeleine cup. Do not attempt to spread the batter to fill the mold. This will happen when it is in the oven. Portioning Madeleines takes a bit of guesswork but the rounded tablespoon seemed to work pretty well.
Set pans on middle rack and bake for 15 minutes until cookies are puffed up in the middle and brown around the edges.
Cool in pans for a few minutes then unmold onto a cooling rack, gently nudging with an offset spatula, if necessary.
Dust shell side of cookies with powdered sugar and serve with your favorite warm beverage for dunking. I froze at this point to pull them back out for Christmas but not before trying one.

Monday, December 18, 2017
Day 18 - Coconut Macaroons
I needed a quick and easy recipe tonight as I was dragging after a busy day at work. Thankfully, Marissa was rested and ready to go when I got home. This recipe has just a couple of ingredients but so delicious. If you love coconut, this recipe is for you! It is just loaded with chewy coconut goodness. We added a chocolate drizzle to half of the cookies and a caramel drizzle to the other half. Again, I had a simple caramel recipe from a salted caramel macaroon recipe, but the caramel didn't work. So I used some left over caramel from the refrigerator that Greg had made for a caramel apple pie he made at Thanksgiving. It was perfect. I think I might give up trying caramel recipes that appear so simple. They never seem to work.
Ingredients:
1 (14 ounce) can Eagle Brand Sweetened Condensed Milk
2 teaspoons vanilla extract
1 to 1 and 1/2 teaspoons almond extract (I omitted as some don't like almond flavor)
2 (7 ounce) packages of flaked coconut (5 and 1/3 cups)
Preheat oven to 325 degrees. Line baking sheets with Reynolds release foil.
In a large bowl, combine Eagle brand, vanilla extract and almond extract (if used). Stir in coconut. Drop by rounded teaspoonfuls onto foil-lined cookie sheets, with a spoon, slightly flattening each mound. We used a small cookie scoop to get them all the same size.
Bake 15 to 17 minutes or until golden. Remove from baking sheets, cool on wire rack. Store loosely covered at room temperature or freeze.
The recipe says you can add a Hershey kiss in the center of each macaroon immediately after baking. I have done this for years and it works well. This year we did a chocolate drizzle instead just to make them look a little fancier. The chocolate drizzle is made just by melting chocolate chips in the microwave in 30 second intervals, stirring in between. Put melted chocolate in plastic piping bag and cut the tip just a little to drizzle.

Sunday, December 17, 2017
Day 17 - Gingerbread Cookies
Today we made adorable gingerbread cookies. We have been making them for years but we wanted to improve our decorating skills so we thought these were a good way to practice and show our creative side. Turns out I don't have one! I tried to do one and it was not so great, so I let Marissa do all the rest. Hers were so cute! She definitely has the artist touch! Even if you don't think you could make them look that good, you should try them. They taste great and they are fun to make, especially with kids.
Ingredients
3/4 cup (6 ounces) unsalted butter, at room temperature
3/4 cup firmly packed light brown sugar (I actually used dark)
1/4 cup molasses
2 egg yolks
2 and 1/3 cups unbleached all purpose flour
2 teaspoons ground cinnamon
2 teaspoons ground ginger
1 teaspoon ground allspice
1/2 teaspoon baking soda
1/4 teaspoon ground cloves
1/4 teaspoon salt
In a bowl, using an electric mixer set on medium speed, beat together the butter, brown sugar and molasses until fluffy, about 3 minutes. Beat in the egg yolks. In a sifter, combine flour, cinnamon, ginger, allspice, baking soda, cloves and salt. Sift the flour mixture directly onto the butter mixture or onto a piece of wax paper and then put into the mixing bowl. Beat in dry ingredients on low speed until well combined. Gather the dough into a ball, it will be soft. Wrap in plastic wrap and refrigerate overnight (I refrigerated for about 5-6 hours).
Preheat oven to 375 degrees. Line cookie sheets with parchment paper. Remove one-third of the dough from the refrigerator. On a lightly floured work surface, roll it out to 1/4 inch thickness. Using a ginger bread cookie cutter (5 inches long), cut out gingerbread people. Carefully transfer the cookies to the prepared baking sheet, place the about 1 inch apart. Gather up the scraps into a ball and wrap in plastic wrap and chill. Repeat rolling and cutting out the cookies with the remaining dough in two batches. Then re-roll the scraps and cut out more cookies.
Bake until cookies begin to turn golden brown on the edges about 10 minutes (I did for 9 minutes). Transfer to wire racks and let cool. Decorate the cooled cookies with white icing as desired. Store in an airtight container at room temperature for up to 1 week or you can freeze for a few weeks.
Recipe says it makes about 20 cookies (I made a few more as my cutter was a little smaller).
Icing (I did 1/4 a recipe and it was still a lot)
2 pounds powdered sugar
5 tablespoons meringue powder
2 teaspoons clear vanilla extract (I didn't use because I didn't have this)
3/4 cup room temperature water
1 tablespoon light corn syrup, for gloss (optional) (I didn't use)
Instructions:

Ingredients
3/4 cup (6 ounces) unsalted butter, at room temperature
3/4 cup firmly packed light brown sugar (I actually used dark)
1/4 cup molasses
2 egg yolks
2 and 1/3 cups unbleached all purpose flour
2 teaspoons ground cinnamon
2 teaspoons ground ginger
1 teaspoon ground allspice
1/2 teaspoon baking soda
1/4 teaspoon ground cloves
1/4 teaspoon salt
In a bowl, using an electric mixer set on medium speed, beat together the butter, brown sugar and molasses until fluffy, about 3 minutes. Beat in the egg yolks. In a sifter, combine flour, cinnamon, ginger, allspice, baking soda, cloves and salt. Sift the flour mixture directly onto the butter mixture or onto a piece of wax paper and then put into the mixing bowl. Beat in dry ingredients on low speed until well combined. Gather the dough into a ball, it will be soft. Wrap in plastic wrap and refrigerate overnight (I refrigerated for about 5-6 hours).
Preheat oven to 375 degrees. Line cookie sheets with parchment paper. Remove one-third of the dough from the refrigerator. On a lightly floured work surface, roll it out to 1/4 inch thickness. Using a ginger bread cookie cutter (5 inches long), cut out gingerbread people. Carefully transfer the cookies to the prepared baking sheet, place the about 1 inch apart. Gather up the scraps into a ball and wrap in plastic wrap and chill. Repeat rolling and cutting out the cookies with the remaining dough in two batches. Then re-roll the scraps and cut out more cookies.
Bake until cookies begin to turn golden brown on the edges about 10 minutes (I did for 9 minutes). Transfer to wire racks and let cool. Decorate the cooled cookies with white icing as desired. Store in an airtight container at room temperature for up to 1 week or you can freeze for a few weeks.
Recipe says it makes about 20 cookies (I made a few more as my cutter was a little smaller).
Icing (I did 1/4 a recipe and it was still a lot)
2 pounds powdered sugar
5 tablespoons meringue powder
2 teaspoons clear vanilla extract (I didn't use because I didn't have this)
3/4 cup room temperature water
1 tablespoon light corn syrup, for gloss (optional) (I didn't use)
Add the powdered sugar and meringue powder to a mixer bowl and mix
for 30 seconds using the paddle attachment. (It's not necessary to sift
the sugar beforehand.) Add the vanilla to the water and stir. With the mixer on its lowest setting, slowly add the water/vanilla
mixture to the dry ingredients. As the water is added, the icing will
become thick and lumpy. Continue to add the remaining water until the mixture reaches a
honey-like consistency. At this point, turn the mixer to medium speed
and mix for 1 minute. After the first minute, turn the mixer to high speed and mix an
additional 2 minutes. Use a spray bottle to get extra powdered sugar off
the edges of the mixing bowl. Mix in the corn syrup if desired. Add more sugar to get to the desired consistency (like the consistency of toothpaste). Immediately remove the icing and place in an airtight container. I put in a squeeze bottle and that is what we used to ice the cookies. The meringue powder was great as it made the icing get hard reasonably fast.

Saturday, December 16, 2017
Day 16 - Mincemeat Pies
Today I made a favorite cookie of my family. They love the pastry crust and the mincemeat and Greg loves saying mincemeat! In case you don't know, mincemeat is a dried fruit mixture. It was apparently made with meat, originally, but this version does not have any meat (thank goodness) and is so delicious. It is not your traditional Christmas cookie unless maybe you are British. I had mincemeat for the first time when I visited my high school friend, Allison during the holidays. Her mom made mincemeat pies and I remembered how delicious they were. Then I saw a recipe in Bon Appetit many years later for a mincemeat pie and I had to try it. The mincemeat was so good. The recipe made a full pie but I decided that mini pies were the way to go. It was very good but I found a better dough a few years later. It was a Food Network recipe by Melissa D'Arabian. She used the dough to make a cookie filled with jam. The pastry was so flaky but very easy to make unlike a traditional pie crust. I decided that pairing it with my mincemeat would be more delicious than just using jam. My family agreed so now we make these every Christmas. I hope you enjoy my creation.
Mincemeat (need only a half recipe for the cookies)
1 and 1/2 cups mixed dried fruit such as pears, apricots, apples, prunes, peaches and figs (about 3/4 pound total) (I used apricots, pears and apples)
1/2 cup pitted dates
1/2 teaspoon cinnamon
1/2 teaspoon ground allspice
1/4 teaspoon freshly grated nutmeg
1/8 teaspoon salt
1/3 cup sugar
1/2 cup dried cranberries (about 3 ounces)
2 cups plus 2 tablespoons water
1 tablespoon cornstarch
2 tablespoons brandy
In a food processor coarsely chop mixed fruit and dates with spices, salt and sugar. In a heavy saucepan combine the dried fruit mixture, cranberries and 2 cups of water and cook at a bare simmer, stirring occasionally, 10 minutes or until fruit is tender (mixture will be very thick). In a small bowl stir together cornstarch and 2 tablespoons water until combined well. Stir cornstarch mixture into dried fruit mixture and simmer, stirring frequently, 2 minutes. Stir in brandy and cool mincemeat. I actually put the brandy in when it is cooking in order to cook off a little of the alcohol. I also use about half the amount of brandy. Mincemeat can be used immediately but will improve in flavor if kept covered and chilled at least 1 day and up to 1 week.
Dough
2 sticks unsalted butter, at room temperature
8 ounces cream cheese, at room temperature
2 cups all purpose flour, plus more for dusting
Beat the butter and cream cheese in a bowl with a mixer until light and creamy. Slowly add the flour mixing just until a dough forms (do not overmix). Divide the dough into 2 balls , then flatten each into a disk. Wrap in plastic wrap and refrigerate until firm, at least 1 hour. (You can also do this in a food processor pulsing the ingredients until the dough comes together).
Preheat the oven to 375 degrees. Roll out 1 disk of the dough on a floured surface with a floured rolling pin to 1/8 inch thick. Cut out as many rounds as you can using a 3 inch round cutter (I used a 2 and 5/8 inch round cutter). Top each round with a heaping half teaspoon of mincemeat filling. Brush the edge of the dough with water, then fold over to make a half moon and press to seal. Place on an ungreased baking sheet lined with parchment paper. Re-roll the dough scraps and repeat, then repeat with the remaining disk of dough.
Bake the cookies until golden, 20 to 22 minutes. Transfer to a rack to cool completely. When cool, frost with a confectioners sugar glaze ( just add a little water to the sugar until get to a spreadable consistency). Alternatively, you can just dust with confectioners sugar when warm.

Friday, December 15, 2017
Day 15 - Rugelach
Today we made a classic Jewish pastry. The dough is made with cream cheese and butter which makes the cookie so light and flaky. The filling is a cinnamon-sugar nut mixture and raspberry jam. The combination is great and the shape of cookie looks like you spent the day in the kitchen baking even though it is really not that difficult to make. Well to be honest, rolling the dough is a challenge for me but I had a great helper in Marissa, who rolled it out effortlessly. Glad, I waited to make these until she was home.
1 cup cream cheese (8 ounces), softened to room temperature
1 cup butter (2 sticks), softened
Cream together cream cheese and butter until smooth and thoroughly blended. Beat in
1 teaspoon vanilla
4 tablespoon sugar
dash or so salt
1 cup unbleached white flour
When smooth, stir in
1 additional cup of flour
Turn dough out onto lightly floured board and knead just a few times, til dough just comes together. Divide dough into thirds (I divide into 4 pieces) and pat each third into a thick flattened circle. Refrigerate dough wrapped in saran wrap for about an hour.
For filling
1/2 cup sugar
1 and 3/4 tablespoons cinnamon
2/3 cup very finely chopped walnuts or almonds ( I use pecans)
Working with the dough circles one at a time, remove one from the refrigerator and roll out into a circle about 14 inches in diameter and about 1/8 inch thick (the diameter might be a little less since we divided the dough into 4 pieces. Dough will be soft and smooth. Leaving a 1 inch blank border at the perimeter of the dough, spread the circle very lightly with jam (I use raspberry, but you could use plum, or apple butter also) and then sprinkle with a fourth of the nut-cinnamon mixture. Cut into 12 slices and roll each slice starting with the wide end. Place rolled wedges on a cookie sheet lined with parchment paper with the rolled end facing down so it doesn't open up during baking. Repeat with the other three dough rounds. Bake for 15 to 20 minutes or until Rugelach are golden brown (I did a little more than 20 minutes). Let them cool on rack. Sprinkle the cooled Rugelach with a generous amount of powdered sugar.

Thursday, December 14, 2017
Day 14 - Chocolate Pretzel Rings
Today's recipe is one that Marissa and I have been making for over 15 years. The recipe was given to me by a coworker, Kate, when I worked at the State. All of my coworkers knew of my love of baking so swapping recipes was a frequent topic of conversation. The first time I made these was during a snow storm. There was an threat of bad weather coming and so we were all discussing what we would do if we had a snow day. Baking was always on my list of snow day activities. Kate told me and a couple of others about this simple but delicious recipe, and we were all dying to try them so we stopped at the grocery store to get the 3 ingredients on our way home from work that day. We waited in long lines with those who were getting the toilet paper and milk in case they were stranded at home in the storm. We were more interested in having our baking supplies. We made the pretzel rings during our snow day and haven't stopped making them since. They are so simple to make and so festive. You can make them for any holiday. Red and green M&M's for Christmas, Red and White for Valentine's Day, Pastels for Easter and of course you can make them using school colors for team tailgates or parties. When Marissa was in first grade, we did a cookie baking day with her brownie troop. These were one of the treats we made since they were so simple to make and the girls could do them by themselves (mostly). Over the years, these treats were made by a lot of folks at Marissa's school but oddly enough they called them belly buttons. Sounds so unappetizing and unsophisticated but that didn't stop us from eating them! Hope you enjoy these simple treats and I think you might find that they will be a regular addition to your holidays.
48 to 50 pretzel rings or wheels (Utz makes wheels that we use)
1 package (8 ounces) milk chocolate kisses (you can also use Hugs)
1/4 cup M&M's
Place the pretzels on an ungreased baking sheet (we use a sheet lined with Reynolds Release aluminum foil). Place a chocolate kiss in the center of each pretzel. Bake at 275 degrees for 2-3 minutes until chocolate is softened. We found that 4 minutes works well. Remove from the oven. We smooth the chocolate over the pretzel wheel with a knife. Place an M&M in the center of each pretzel, pressing slightly so chocolate fills the pretzel. Refrigerate for 10 minutes until chocolate is firm. Store at room temperature. Makes about 4 dozen.
Note: Before baking a full tray, test a few on a small tray to make sure the temperature is right. I have made the mistake before of putting a full tray in the oven and having the temperature be too hot and scorch the chocolate which then doesn't melt. Testing a few makes sure the temperature is right.

Wednesday, December 13, 2017
Day 13 - Ricotta Cookies
Today, the baking duo was reunited as Marissa came home from college for winter break. We decided to make a simple but classic cookie that is so delicious. It is a favorite of my niece and nephews, Christy, Joey and David as their grandmother used to make Ricotta cookies for them all the time when they were little and they loved them so much. We divided the batter in half and added Christmas sprinkles in half the batter. The other half we left plain. We then frosted the sprinkled half with a buttercream frosting and the plain half with a lemon glaze. Marissa loves lemon ricotta pancakes which are so popular right now and this gave us the idea of the lemon glaze since lemon and ricotta go so well together. We essentially made two different but equally delicious cookies with the same batter.
Ingredients:
1 stick unsalted butter, softened
1 cup sugar
1/4 cup ricotta cheese
1 egg
1 teaspoon baking soda
1/2 teaspoon salt
1/8 teaspoon vanilla
2 cups flour
Beat butter and ricotta in electric mixer until creamy. Add vanilla, and sugar and mix until well combined. Add egg and mix until incorporated. Slowly stir in dry ingredients and mix well. If adding sprinkles to batter, add at this point. Roll dough into small balls and roll in sugar and place on ungreased cookie sheet. Bake in preheated oven at 350 degrees for 10 minutes. Cool on wire rack. Makes about 40.
Frosting (enough for full batch of cookies)
2 - 2 1/2 cups confectioners sugar
1/2 cup softened butter
2 teaspoons vanilla
3-4 tablespoons milk or water
Mix well and add more water or confectioners sugar to get to the right consistency. Frost cooled cookies and add sprinkles on top.
Lemon Glaze (enough glaze for full batch -- I did half recipe for my half batch)
1 and 1/2 cups confectioners sugar
3 tablespoons lemon juice
zest of 1 lemon (or to taste -- I used only a small amount about 1/2 teaspoon to 1 teaspoon for half recipe)
Mix confectioners sugar and lemon juice until smooth consistency. Add more lemon juice or confectioners sugar to get to the right consistency. Add lemon zest. Lemon zest intensifies the lemon flavor. Spread over cooled cookies with a knife.


Tuesday, December 12, 2017
Day 12 - Gingersnaps
I have been making gingersnaps for a long time but this year, I wanted to change it up a little so I started looking around for variations to the traditional recipe and found one that had caramel inside the gingersnap. I thought that sounded interesting so kept reading. The caramel used for the recipe was done in 6 minutes in the microwave. I thought I had to try it because I was skeptical that it would work. I have made many caramels over the years and they are typically very labor intensive and tricky to get right. Well I was not able to get the microwave version to work. The caramel did not get hard enough to form into a ball. Fortunately, I had some Kraft caramels left over from Twix cookie project so decided to see if putting a caramel in the middle improved the cookie. I cut the caramel square in half and then pushed it into my gingersnap balls covering the caramel with dough. The result was good but I am not sure if it significantly improved the original. I will let my Christmas guests decide as I did half with caramel and half without. The recipe for the gingersnaps comes from the Inn at Little Washington and was in Bon Appetit magazine years ago to use the cookie crumbs for the crust for the Inn's marble cheesecake. The gingersnaps did made a great crust but they were even better as a cookie. Simple, classic flavors with a chewy consistency.
Ingredients:
2 cups all purpose flour
1 tablespoon baking powder
1 teaspoon ground cloves
1 teaspoon cinnamon
1 teaspoon ground ginger
1/4 teaspoon salt
3/4 cup (1 and 1/2 sticks) unsalted butter, room temperature
1 cup sugar
1/4 cup light molasses
1 egg, beaten to blend
1/3 cup sugar (to roll balls in -- or use Christmas colored sugar)
Preheat oven to 350 degrees. Sift the first 6 ingredients into a bowl. Using electric mixer, cream butter with 1 cup sugar in another bowl until light and fluffy. Mix in molasses and egg. Add sifted dry ingredients and mix until just combined. Cover and refrigerate dough at least 1 hour (Can be prepared 1 day ahead).
Form dough into round balls. Roll balls in the 1/3 cup sugar (or Christmas colored sugar). Arrange balls in ungreased cookie sheets spacing 2 inches apart. Bake until cookies are brown on bottom, about 12 minutes. Transfer to rack and cool completely. Place in air tight container and freeze.

Monday, December 11, 2017
Day 11 - Chocolate Peppermint Bars
I made these bars for the first time last year and everyone loved
them so much, I decided they needed a repeat appearance on the cookie
tray. The chocolate shortbread base and the soft peppermint filling,
topped with chocolate, are a great combination and taste similar to a
York Peppermint Patty. Hope you enjoy them.
For the Chocolate Shortbread:
1 cup all purpose flour
1/2 cup granulated sugar
2 tablespoons unsweetened cocoa powder
1/4 teaspoon kosher salt
8 tablespoons (1 stick) unsalted butter
For Peppermint Filling and Chocolate Top
3 and 1/4 cups confectioners sugar
3 tablespoons unsalted butter, softened
1/4 cup heavy cream
2 and 1/4 teaspoons peppermint extract, or to taste
9 ounces bittersweet chocolate (at least 60% cocoa solids), chopped -- Think you could use half this amount
1/2 teaspoon coconut oil (optional - I did not use)
Preheat oven to 325 degrees. Line a 9 inch square baking pan with parchment paper, allowing 2 inches of paper to hang over the sides.
To make the shortbread, in a food processor, pulse together flour, sugar, cocoa powder and salt. Add butter and process until a smooth dough forms. Press dough evenly into the bottom of the prepared baking pan. Bake until firm to the touch and sides of the crust are beginning to pull away from the pan, about 25 minutes. Cool completely.
To make the filling, in a mixer fitted with the paddle attachment, combine the confectioners sugar, butter, cream and peppermint extract. Beat until mixture forms a thick, smooth paste. Press filling evenly over the cooled shortbread. Chill to set the filling for at least 1 hour and up to overnight.
Use parchment paper overhang to lift the shortbread and peppermint out of the baking pan and onto a cutting board. Cut into 1 and 1/2 inch squares (about 36 squares). I made them much smaller. Place squares on a rack placed over a parchment-lined sheet tray and let them come to room temperature for about 15 minutes.
In the top of a double boiler or in a heatproof bowl set over a pan of simmering water, melt 7 ounces of the chocolate stirring occasionally until smooth. Remove from heat and add remaining 2 ounces of chocolate and let sit for 2 minutes. Add coconut oil, if using (I did not) and stir the chocolate until smooth. Spoon 1 teaspoon chocolate on top of a cut peppermint square, using the back of the spoon to spread the chocolate to the edges (use less chocolate if your squares are smaller like mine). Be sure to fully cover the top of the square with chocolate. Leave the sides exposed, though it's okay if some of the chocolate drips down. Repeat with remaining squares. Let squares sit at room temperature until chocolate is set, at least 1 hour.

Sunday, December 10, 2017
Day 10 - Buckeyes
I have been wanting to make buckeyes for quite a while. I saw Valerie Bertinelli make them on her Food Network show and they looked so delicious. She did a twist on the traditional buckeyes by putting chopped heath bars in the mixture. Peanut butter, chocolate and toffee sounded like an incredible combination. You have probably guessed my love of peanut butter and chocolate with my Day 1 blog post but adding toffee I thought would take it to another level. From the time I saw the Food network episode earlier this year, I knew it would be on my Christmas cookie tray. I was just a little nervous about about whether I would be able to make them look good as the dipping of the peanut butter balls in the chocolate seemed difficult. I did a little bit of research on the internet to see if there was a trick to making them look good. Most people said they used a toothpick and put the chocolate in a narrow bowl that allowed the chocolate to be deep enough for dipping. The one complaint was that the toothpick hole looked a little sloppy. As I was doing my research, I stumbled upon a blog post that said they made the buckeyes from the Baked Explorations cookbook and thought it was a little less sweet than the traditional buckeye. I immediately pulled my cookbook out ( I have all of the Baked cookbooks) and decided that was the recipe I needed to use. It was a little bit different as it used a small amount of cream cheese and graham crackers. I thought that would be an improvement to the traditional recipe. The recipe also said you could use crunchy peanut butter so I decided I would add some chopped heath bars to half of the batter (in keeping with Valerie Bertinelli's version). I think the result of all of these modifications was terrific. There is only one problem, I was almost banished from the house by my son Michael, who said he couldn't understand why I would even consider making something with that name. Sorry Penn State fans, but this treat is worth it. Hope you don't think I am a traitor. Maybe we can call them Lioneyes instead?
Ingredients:
1/4 cup (2 ounces) cream cheese, softened
1 and 1/2 cups peanut butter
1 cup graham cracker crumbs (about 14 graham crackers)
3 cups confectioners sugar
10 tablespoons unsalted butter, melted and cooled
12 ounces good-quality dark chocolate (60-72%), coarsely chopped ( I used Trader Joe's big dark chocolate bar)
In a bowl of a standing mixer fitted with the paddle attachment, beat the cream cheese and peanut butter, until combined. Add the graham cracker crumbs and beat on medium speed for 10 seconds. Add the confectioners sugar and butter. Beat at low speed for 20 seconds to prevent the sugar from spilling over, then gradually increase the speed until the mixture is completely combined. Scrape down the sides and bottom of the bowl and beat again. The mixture will feel slightly dry. If you want to add the health bars, you can do it at this point. I divided the mixture in half and then put 3/4 cup of chopped heath bars in one half of the mixture. Shape the buckeyes into balls. The recipe says to take a tablespoon's worth of filling. I wanted them smaller so used a half tablespoon. Use your hands to form it into a ball. Place the balls on a sheet pan lined with parchment paper. They can be placed close together, just not touching. Once all the balls have been formed, I put into the freezer so the balls would be hard. The recipe doesn't say to do this but I think it made it easier to dip.
While the balls are getting set in the freezer, melt the chocolate on top of a double boiler, set over hot water, stirring until completely smooth. Pour the chocolate into a small, deep bowl. Let it cool to tepid ( about 100 degrees F, body temperature). I actually left it on the double boiler (heat off).
Put a toothpick in each frozen buckeye and then dip in the chocolate, rolling the ball around from side to side to cover almost the entire peanut butter center, leaving a small part uncovered. Let the excess chocolate drip back into the bowl and return each chocolate covered buckeye to the sheet pan. Refrigerate the entire sheet pan about 30 minutes to set the chocolate. The Baked cookbook recipe does not use a toothpick but instead says to use a fork or large skewer. I tried this but could not get it to work. The toothpick method worked much better for me. Once the chocolate is set, remove the buckeyes from the refrigerator and cover the toothpick hole by gently pinching the top with your index fingers. It closes up easily.
The recipe says the buckeyes will keep for up to 3 days lightly covered in the refrigerator. I put mine in a Ziploc bag and placed in the freezer as I wanted to keep them fresh for a longer period. The recipe make 36 to 42 buckeyes. I made double this amount as mine were half the size. I also needed to add a little more chocolate to dip all the balls.

Saturday, December 9, 2017
Day 9 - Oatmeal Cream Pies
Today was the perfect baking day. It started snowing early this morning so I stayed in most of the day. It was beautiful to watch the snow from my kitchen window while I was baking. I was baking with a purpose today as I wanted to make some cookies for a holiday potluck in my office to watch the Annapolis boat parade. In case you don't know what this is, and if you don't live (or work) in Annapolis, there is a good chance you don't, boats get all decked out in lights, and parade around Spa Creek. It is a great way to kick off the holiday season. I chose today's cookie because I have made these for years with rave reviews so figured they would be a hit at the party. The idea for these came from Sally, after she went to one of her daughter Kristin's tailgates when she played field hockey and lacrosse at Princeton. One of the mom's brought these to the tailgate. I thought it was such a great idea, I immediately made them the next opportunity I had to bring something to an event. I used to make them for tailgates, end of season parties, etc. when my kids, Michael and Marissa were in high school. There were always a hit. The cookie is a regular oatmeal raisin cookie ( I use the one on the back of the Quaker Oats box - Vanishing Oatmeal Raisin Cookies) and the original recipe for the cream pies said to use store bought frosting in the middle to make the sandwiches. I did this for many years but always felt the frosting had a little bit of an artificial taste. Then about 4 years ago, Sally sent me a recipe for an oatmeal sandwich cookie that had a white chocolate buttercream frosting and when I tried it on my oatmeal cream pies I knew I would never go back to store bought frosting. I don't want to sound like a homemade only snob but the frosting was so much better! You can use store bought frosting to save time, I promise I won't judge you! Little Debbie look out!
Recipe for the Oatmeal Raisin Cookies
1/2 cup (1 stick) plus 6 tablespoons butter, softened
3/4 cup firmly packed brown sugar (I use dark)
1/2 cup granulated sugar
2 eggs
1 teaspoon vanilla
1 and 1/2 cups all- purpose flour
1 teaspoon baking soda
1 teaspoon ground cinnamon
1/2 teaspoon salt (optional)
3 cups Quaker oats (quick or old fashioned, uncooked - I used old fashioned)
1 cup raisins ( or Craisins -- I use these a lot if I am making for the holidays)
Preheat oven to 350 degrees.
In an electric mixer, beat butter and sugars on medium speed until creamy. Add eggs and vanilla; beat well. Add combined flour, baking soda, cinnamon and salt. Add oats and raisins; mix well.
Drop dough by rounded tablespoons onto ungreased cookie sheet (I actually roll dough into small balls).
Bake for 8-10 minutes (I do 10) or until light golden brown. Cool 1 minute on cookie sheet. Flatten each cookie with a metal spatula then cool cookie on a wire rack.
Once cooled make cookies into sandwiches, using the white chocolate buttercream frosting.
Recipe says it makes 4 dozen oatmeal raisin cookies. Since I roll my dough into small balls (about the size of a walnut, I made about 70 cookies that then sandwiched, made about 35 oatmeal cream pies.
Recipe for White Chocolate Buttercream Frosting
2 cups white chocolate chips
1 cup unsalted butter, at room temperature
3-4 cups powdered sugar
1 teaspoon vanilla extract
2 tablespoons milk or water, as needed.
Melt chocolate chips in a microwave safe bowl and heat in 30 second intervals until chips begin to melt, about 1 minute. Stir and repeat, heating chips about 10 seconds at a time until thoroughly melted. Stir until chocolate is smooth and no more lumps remain. Beat butter with an electric mixer on medium speed until fluffy. Beat in half the powdered sugar, all the melted white chocolate, vanilla and milk or water (if needed) until mixture is smooth and creamy. Slowly beat in remaining powdered sugar until smooth. If frosting is too stiff, add in a little more milk or water. This recipe makes a lot of frosting. A half recipe would be enough for making the Oatmeal Cream Pies.

Friday, December 8, 2017
Day 8 - Pecan Tassies
Today's cookie is a staple on my Christmas cookie tray. My sister Sally shared this recipe with me many years ago when a friend made them for a party she attended. You may start to see a theme, all great recipes seem to make their way to me from Sally. I love this recipe as it is basically a miniature pecan pie. My mom made pecan pie for Thanksgiving and Christmas each year so it has a special place in my heart! Mom's pie though had an awesome twist. She added chocolate chips to it which made it amazing. I changed this cookie recipe a little to add a couple of chocolate chips to each tassie to try and replicate the flavor of Mom's pie. While not exactly the same as Mom's pie, it does make the tassies even better. I think you are also finding another theme in my cookies, chocolate makes everything better! I make half with chocolate chips and half plain for those who don't share my chocolate obsession. I hope you love these as much as we do.
Shell: Makes 24
1 cup flour
3 ounces cream cheese, cut into small pieces
1/2 cup unsalted butter, cut into small pieces
Put the flour, cream cheese, and butter into a food processor and pulse until a lumpy, grainy, sticky mass. Pulse a little longer until dough forms into one ball. Separate dough into 24 balls and press into small muffin tins. I do this recipe twice since a single recipe makes 24 and the filling is for 48 tassies.
Filling: (for 48 tassies)
1 and 1/2 cup brown sugar
2 beaten eggs
2 tablespoons melted butter
2 teaspoons vanilla
1 cup pecans, chopped
Mix brown sugar, eggs, melted butter and vanilla together. Spoon into each crust about 3/4 full (about half a tablespoon in each). If making the chocolate chip version, add 2 chocolate chips in each one. Top with chopped pecans and pat down a little.
Bake in preheated oven at 375 degrees for 20 minutes. Cool 5 minutes and take the tassies out of the tins with a sharp knife. Cool completely. I drizzle melted chocolate chips (melted in the microwave for two 20 second intervals stirring in between) on top of the chocolate chip tassies. Freeze once chocolate is set.
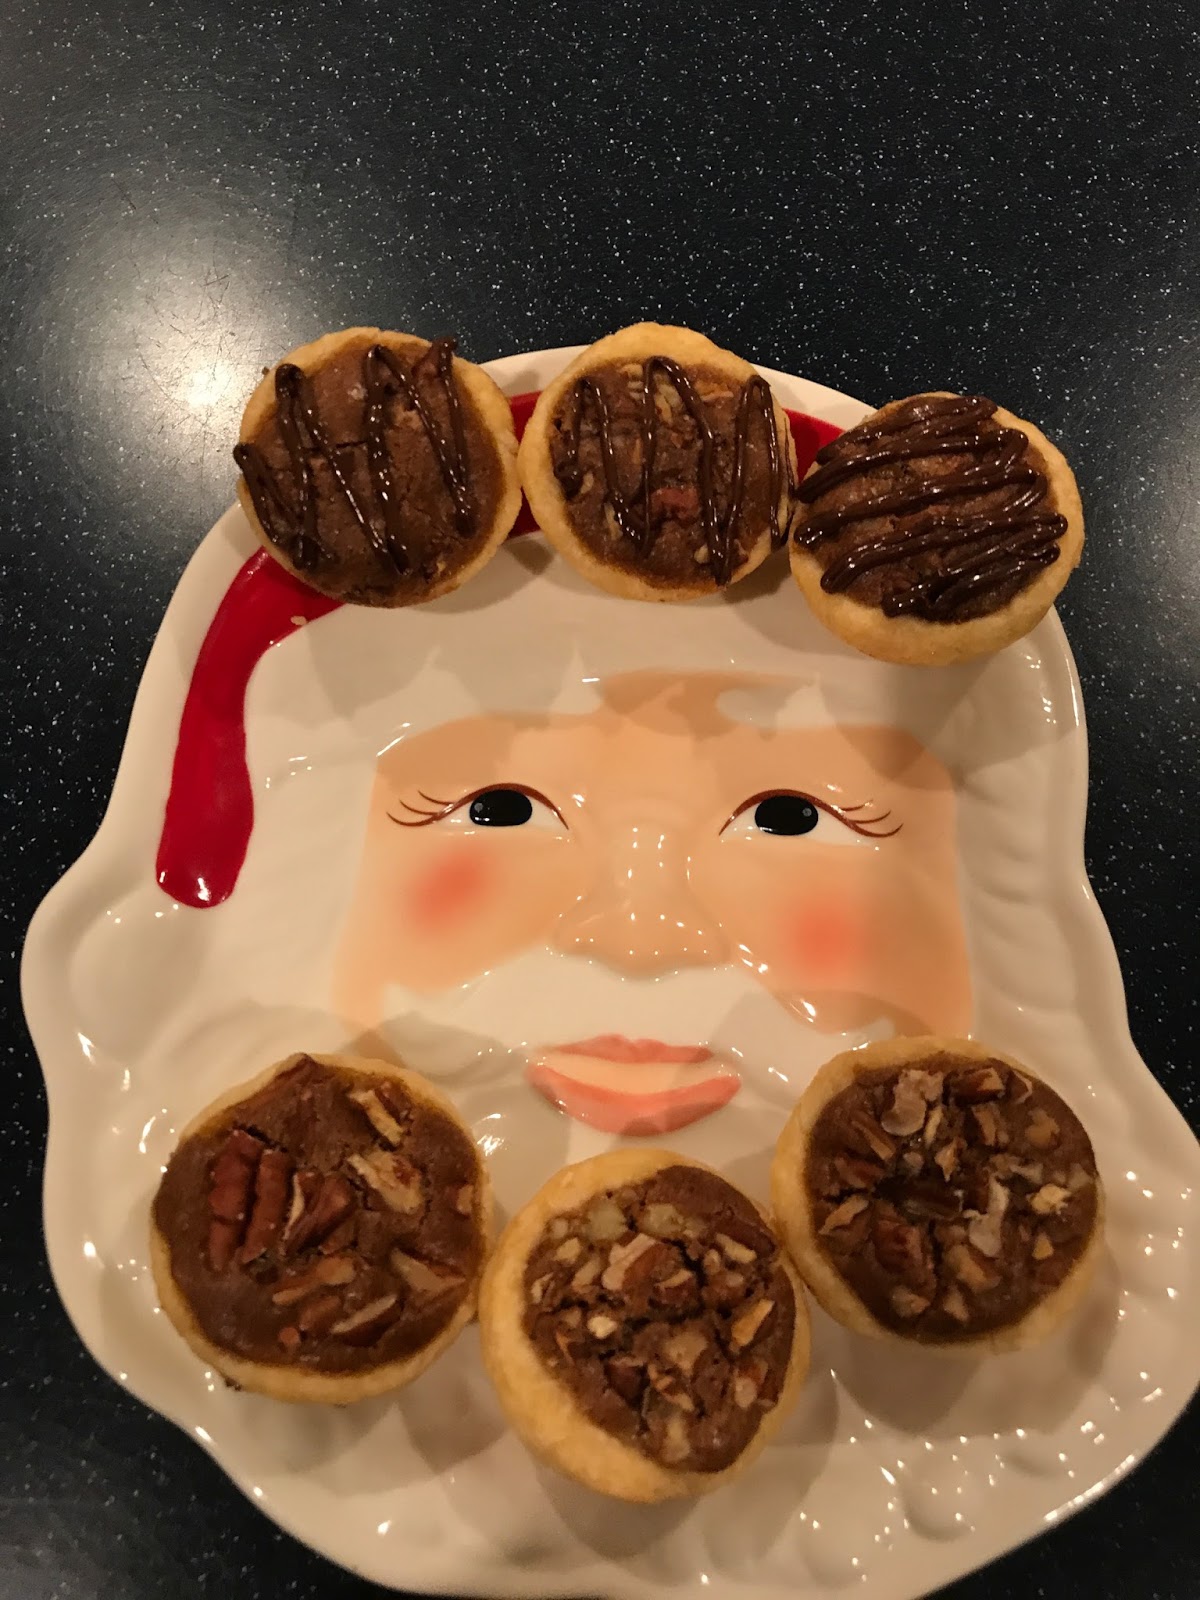
Thursday, December 7, 2017
Day 7 - Mini S'mores Cups
I chose this recipe today because it is so easy to put together. I needed a cookie that was not time intensive since I was going to an after work holiday party and knew I wouldn't be able to start until later in the evening. It took amount 45 minutes to put together and bake (only bakes for a few minutes). You won't believe that something this delicious could take so little time to make. I first made this recipe for a dessert platter I created for Marissa's pre-prom party at her friend's house during her senior year of high school. I found the recipe on the internet and thought the idea was so cute and knew Marissa and her friends would go crazy for them. What teenager (or adult, for that matter) doesn't love s'mores? From that point forward, I have made them every Christmas and again this year for my nephew, David's, pre-prom party. Enjoy.
Ingredients:
1 cup of finely crushed graham cracker crumbs
1/4 cup confectioners sugar
6 tablespoons melted butter
4 milk chocolate Hershey bars
12 large marshmallows
Directions:
Preheat oven to 350 degrees.
Mix the graham cracker crumbs confectioners sugar, and melted butter in a small/medium bowl. Press a small amount into 24 mini-muffin tins (use all the crumbs divided among the 24 tins). Bake for 4-5 minutes until the edges of the cups start to bubble slightly. Remove from oven (but keep the oven on).
Break 2 of the Hershey bars into rectangles and put one rectangle on top of each graham cracker cup. Cut 12 marshmallows in half crosswise, dipping shears into cold water to keep them from sticking (I don't seem to need to do that - my kitchen shears cut the marshmallows pretty easily). Put one half marshmallow, cut side down, on each cup. Put them back in the oven for 1-2 minutes until the marshmallows have just slightly softened. Remove from oven and let the muffin tin trays cool on a rack for 15 minutes and then remove the cups from the tins using a knife to help the s'mores cups pop out.
When the cups are completely cooled, melt remaining chocolate bars in the microwave (in 20 second intervals) and dip the top of each cup into the melted chocolate (or spoon on cup and smooth out with a knife). Let the chocolate set at room temperature. Once completely set, you can put in air tight container and freeze.

Wednesday, December 6, 2017
Day 6 - Cherry Pistachio Biscotti
Today's cookie is another Ina Garten recipe from her Cooking with Jeffrey cookbook. The cookbook came out last year before the holidays so I was happy to try several of her recipes for Christmas as I knew they would not disappoint. I really had not made many biscotti recipes as I had found the store bought versions tended to be pretty hard that you could only eat them dunked in a cup of coffee. I tend to like softer chewy cookies so resisted making biscotti. This recipe turned out to be a softer biscotti and the flavors were perfect. Have with coffee or without, you will love them and the cherry and pistachio combination is perfect. This recipe does have a few steps as it is twice baked but well worth the effort.
Ingredients:
12 tablespoons (1 and 1/2 sticks) unsalted butter, at room temperature
1 cup light brown sugar, lightly packed
1/2 cup granulated sugar
1 and 1/2 teaspoons ground cinnamon
3 extra large eggs, at room temperature, one separated (again I used large eggs)
2 teaspoons pure vanilla extract
3 cups all purpose flour
1 and 1/3 cup almond meal or almond flour, such as Bob's Red Mill
1 teaspoon baking powder
1/2 teaspoon kosher salt
1/2 cup shelled pistachios
1/2 cup whole dried cherries
Turbinado sugar, such as Sugar in the Raw
Preheat oven to 300 degrees. Line a sheet pan with parchment paper.
Cream the butter, brown sugar, granulated sugar, and cinnamon in an electric mixed fitted with the paddle attachment at medium speed for 3 minutes, until light and fluffy. With the mixer on low, gradually add the 2 whole eggs, the egg yolk (reserve the egg white), and vanilla and mix until combined, scraping down the bowl with a rubber spatula.
In a medium bowl, combine the all purpose flour, almond meal, baking powder and salt. With the mixer on low, slowly add the dry mixture to the butter-sugar mixture, mixing only until combined. Scrape down the bowl and beater and make sure all the ingredients are combined. Stir in the pistachios and cherries.
Roll the dough into a ball on a well floured board and cut in half (I did in thirds to make a little smaller). With floured hands, roll each piece into a cylinder about 11 inches long by 2 inches in diameter and place them 3 inches apart on the prepared sheet pan. (If making 3 logs, use a second sheet pan with parchment paper. The 3 logs end up being about 9 inches long.
Place the reserved egg white in a bowl and beat with a whisk for 15 seconds. Brush the logs with the egg white (save the rest) and sprinkle each log with 1 teaspoon of turbinado sugar. Bake for 45 minutes (40 if making 3 logs), until lightly browned (the logs will be soft). Cool for 30 minutes.
Turn the oven down to 275 degrees.
Line two sheet pans with parchment paper. With a serrated knife, slice the biscotti 1/2 inch thick at a full 45-degree angle. Place slices cut side up on the prepared sheet pans. Brush them with the egg white and sprinkle generously with turbinado sugar. Bake for 45 to 50 minutes, turning each slice once, until browned and fully baked. Transfer to a baking rack to cool. Cool completely and store in a sealed container at room temperature for up to a week or freeze like I do as soon as they are cooled.

Tuesday, December 5, 2017
Day 5 - Andes Mint Cookies
This cookie is another new cookie this year. It has some of our favorite flavors, chocolate and mint. I was draw to these cookies because of these flavors but also because of the appearance. The top of the cookie is a melted Andes mint which gives it a beautiful swirled look. The taste of cookies are the most important but those that also look pretty are the ones that come back to my tray year after year. This one will be a keeper. I can't wait for my chocolate and mint lovers to try these. It has a soft chewy texture and intense chocolate flavor almost like a minty brownie. The swirl on top was more subtle than I was expecting but still pretty.
Ingredients:
1/2 cup unsalted butter, softened
1/2 cup white sugar
1/2 cup brown sugar
1/2 teaspoon vanilla extract
1/4 teaspoon mint extract
1 egg
1 cup flour
1/2 cup cocoa
1 teaspoon baking soda
1/2 teaspoon salt
3/4 cup Andes mint baking pieces
24 Andes mints (or more if you make them smaller like I did)
Directions:
Preheat oven to 350 degrees.
Beat butter with electric mixer until lightly colored. Add sugars until light and fluffy. Beat in the egg, vanilla and mint extract.
In a separate bowl combine flour, cocoa, baking soda and salt. Stir into the wet ingredients on low speed. Stir Andes mint baking pieces by hand.
Roll the dough into 1 inch balls (mine were smaller, more like the size of a whole walnut) and refrigerate for at least 2 hours (I did it overnight).
Place balls on cookie sheet and and bake for 9-11 minutes (I did for 9 minutes -- they look soft when you pull them out which is what you want). Do not overbake.
Remove cookies from oven and place an Andes mint on top of the cookie. If you make them larger, like the recipe calls for, you would use one and a half Andes mints. Let them sit for a minute until mint has melted and gently spread on the cookie with a knife. Let them cool completely before storing or enjoy warm. The recipe says it makes 18 cookies but I made about 40 since I made them smaller.

Monday, December 4, 2017
Day 4 - Spicy Hermit Bars
This recipe was added to my cookie tray last year. The recipe comes from Ina Garten's Cooking with Jeffrey cookbook. I love Ina and all of her recipes and she and her husband Jeffrey are so cute (relationship goals)! This bar is perfect for the holidays with all the spices. It is similar to gingerbread which is a flavor that is a must at Christmas. The recipe is easy to put together which is important when you are trying to bake a cookie after you get home from work. Hope you enjoy it as much as we do.
Ingredients:
1/4 pound (1 stick) unsalted butter, at room temperature
1 cup light or dark brown sugar, lightly packed (I used dark)
1 extra-large egg, at room temperature (I use large)
1/4 cup unsulphured molasses
2 cups plus 2 tablespoons all-purpose flour
2 teaspoons baking soda
2 teaspoons ground ginger
1 and 1/2 teaspoons ground cinnamon
1 and 1/2 teaspoons ground cloves
1/2 teaspoon kosher salt
1/2 cup golden raisins
1/3 cup minced crystallized ginger (not in syrup)
1 cup sifted confectioners' sugar
Dark rum, such as Mount Gay ( I used a splash of vanilla instead)
Grated lemon zest (I omitted)
Directions:
Preheat oven to 375 degrees. Line a sheet pan with parchment paper.
Cream butter and brown sugar in an electric mixer fitted with the paddle attachment and beat on medium speed for 2 minutes, until light and fluffy. With the mixer on low, add the egg, scrape down the bowl, then mix in the molasses.
Sift together the flour, baking soda, ground ginger, cinnamon, cloves and salt. I sift onto a piece of wax paper as it makes it easy to put into the mixer after sifting. With the mixer on low, slowly add the dry ingredients to the butter mixture, mixing just until combined. Stir in the raisins and crystallized ginger. Cover bowl with plastic wrap and refrigerate 30 minutes.
Turn dough out on lightly floured board, form into a disk with lightly floured hands and cut in half (I cut in thirds since I wanted smaller cookie bars. Roll each half (or third) into a log 12 inches long. Place on prepared sheet pan 3 inches apart. If doing in thirds, use another pan for the 3rd log. Bake for 20 minutes (1 minute less if doing 3 smaller logs). The logs will still be soft in the center.
Meanwhile, whisk the confectioners' sugar with 5 to 6 teaspoons rum to make a pourable glaze. I omitted the rum and used a splash of vanilla and a couple of teaspoons of water to make the glaze. While the logs are still warm, drizzle the glaze back and forth across the logs with a teaspoon and sprinkle with lemon zest (I omitted). You can add sprinkles if you want to give it an extra Christmas flare! Allow to cool and then cut each log crosswise into 1 and 1/2 inch wide bars.

Sunday, December 3, 2017
Day 3 - Twix Cookies
One of the things I like best about this project is finding new cookies to try. Today's cookie is a new recipe that I found on the internet. I was drawn to it by the name and also the picture that I found. The combination of a shortbread cookie, caramel and chocolate sounded amazing. These did not disappoint! They were pretty time intensive with multiple steps but well worth the effort. My family thought it might need a stronger chocolate flavor maybe dipping the entire cookie in chocolate. If you don't know this already, you will figure out quickly from following the blog that we are a family of chocolate lovers. Hope you enjoy this recipe.
Ingredients:
Cookie:
1 and 1/2 cups unsalted butter, softened
1 cup powdered sugar
1 teaspoon vanilla
3 cups flour
3/4 teaspoon salt
Caramel layer:
15 oz of caramel (I used Kraft caramels squares -- the recipe used Kraft caramel bits)
2 tablespoons evaporated milk
Chocolate layer:
2 cups milk chocolate chips
2 teaspoons shortening ( I used a teaspoon of coconut oil)
Directions:
Preheat oven to 350 degrees.
With an electric mixer, cream butter and sugar together until light and fluffy. Add vanilla, flour and salt and mix until well combined.
On a lightly floured surface, roll the dough out to 1/2 inch thick. ( I think mine were more like 1/4 inch thick). With a small biscuit cutter, (I used 1 and 1/2 inch cutter as I like the cookies small -- allows you to sample more cookies) cut out cookies and place on a cookie sheet lined with parchment paper. Bake for 14-16 minutes (I did 14 minutes) or until cookies are set and just beginning to brown on the bottom. Remove from oven and let cool completely.
Combine caramel and evaporated milk in a microwave safe bowl and melt according to package directions. I did for two minutes stirring after each minute, then continued in 20 second intervals until melted. Spread over cooled cookies and let set. I had to reheat caramel a few times before I was completely done spreading the caramel on the cookies.
In a small microwave safe bowl, melt chocolate chips and shortening (or oil) in 30 second intervals, stirring in between each interval, until melted and smooth. Spread over the top of cooled caramel.
Let chocolate set before serving. Once set, I put in airtight container and froze. I ended up making about 90 small cookies. The recipe called for making 36 cookies so they must have used a bigger biscuit cutter.

Saturday, December 2, 2017
Day 2 - Butter cookies
Today, I made a classic butter cookie which is my husband Greg's favorite cookie from his childhood. His mom, Beverly, and her mother (Nana) made them every Christmas so they are now a staple on our Christmas cookie tray. The recipe is easy to put together but needs a cookie press which I have yet to find one that works well. The press I have gave me an arm workout and in fact I had to recruit Greg to help. Good thing he works out every day! Here's the recipe.
Butter Cookies
Ingredients:
3 cups flour
1/2 teaspoon baking powder
1/4 teaspoon salt
1 cup unsalted butter
1 cup sugar
1 egg
2 teaspoons vanilla extract
1/4 teaspoon almond extract (I omitted since some people in our family don't like almond flavoring -- you know who you are)
Preheat oven to 350 degrees.
Cream butter and sugar until light and fluffy. Beat in egg and vanilla until incorporated. Add dry ingredients -- flour, baking powder and salt until dough comes together. Chill dough thoroughly but if it stays in the refrigerator too long it might be too hard to work in the press. Press cookies onto a baking sheet, top with sprinkles and bake for 10 minutes. Once out of the oven, loosen cookies on the tray and then let cool slightly on the tray. Remove from tray and cool completely on a rack. Once cool, pack in airtight container or Ziploc to freeze. Recipe makes about 140 cookies so you will have a lot of cookies to share.

Day 1 - Peanut Butter Temptations
I think it is fitting to start with these cookies as it has been a tried and true recipe that we have made for over 20 years. My sister Sally, who is an excellent cook and baker, shared this recipe from her mother-in-law, Marty. Any recipe from Marty is a keeper as I have never tried any of her recipes that I didn't love. I have made these cookies so many times, not only for holidays but any time we need a peanut buttery treat. How can anything with Reese's peanut butter cups be bad? Here is the recipe.
Peanut Butter Temptations
Ingredients:
1/2 cup butter
1/2 cup peanut butter
1/2 cup sugar
1 egg
1 teaspoon vanilla
1 and 1/4 cup flour
3/4 teaspoon baking soda
40 peanut butter cups
Preheat oven to 375 degrees
Cream together, butter, sugar and peanut butter. Beat in egg and vanilla until combined. Sift in flour and baking soda. Refrigerate dough until chilled, can be overnight. Shape dough into 1 inch balls (make 40 balls). Place in un-greased small muffin tins. Bake 8-10 minutes ( I usually take out at 10). Do not over- bake.
Unwrap peanut butter cups while dough is baking. Press one peanut butter cup in each muffin tin until only the tops show. When making for the holidays, add Christmas sprinkles to tops. Let set a few minutes and then remove from muffin tin using a sharp knife. Cool completely on wire racks. Once cool, put in air tight container (or gallon size Ziplocs) and freeze until Christmas!

My Christmas Cookie Advent
Welcome to my Christmas Cookie Blog. I am known to family and friends for my love of advent calendars and Christmas baking. Over the years, I have made or bought advent calendars for my sisters and nieces and nephews to get them into the holiday spirit. In 2013, my daughter Marissa's senior year of high school, we decided to do a twist on the advent calendar by making a different Christmas cookie or confection every day in December leading up to Christmas. Marissa blogged about it and would share the cookies at school the next day. Her classmates grew to look forward to it and were even disappointed when there was a snow day that prevented her from sharing her treat for the day. We really enjoyed the project and have continued to bake lots and lots of cookies each year so that we have a beautiful cookie tray for Christmas. The cousins even made a competition out of it to see who could eat all 24 cookies after a big Christmas dinner. The winners received t-shirts the next Christmas! This year, I have decided to bake a cookie every day on my own until Marissa comes home from school. Hope you enjoy the blog and maybe you will find a few new recipes to add to your holiday baking!


Subscribe to:
Posts (Atom)